I'm sure you all have at least one camp chair. And I'm sure each of those camp chairs has a POS bag that ripped the first time you put the chair back in it. Here's how ours looked at the beginning of this project, including one huge rip at the bottom of one of the bags.


I started by measuring the current bags to determine how much fabric I needed. I had intended to make these bags months ago, but I was never quite sure what fabric would be best since it needed to be able to stand up to a lot of use and dirt. Then a light bulb went off a few weeks ago: I could use canvas drop cloth, which I knew came in large quantities, was relatively inexpensive, and had to be able to stand up to abuse. Score!
So I bought a 6 x 9 canvas drop cloth from Lowe's and got to work. Unfortunately, I failed to measure appropriately the first time and the bag ended up two inches too short. Here's another lesson on my impatience.


Or the second time, when the bag wasn't wide enough to fit over the chair. Dang it. Three hours of cutting, ironing, sewing.... wasted. At least the pattern on the second bag fit exactly right.

So, after screaming obscenities taking a few calming breaths, I started over. I double checked all of my measurements and thought again about the design, making sure I had covered all the variables.
First I cut my fabric, two rectangles (20" x 40") and two squares (5"). The rectangles were the bulk of the cover, and the squares were the bottom of the bag.

Then I ironed in the 0.5" seams on the longest sides and a 1" seam on the top (where the drawstring would go).


I sewed the sides first, then the top seam.

The next step was to attach the bottom square. Taking into account a 0.5" hem, I found it easiest to cut the corners diagonally. Remember I did this twice before, so by this bag I felt like I had it down pat.

I pinned the square so that the right (i.e., pattern side, if this fabric hadn't been canvas) side of that shape to the right side of the rectangle. Trust me when I say that I did three sides with the square in the wrong direction and there was even more screaming a lot of seam ripping. Have I mentioned that I don't own a seam ripper? Yeah... I seam ripped with my very sharp fabric scissors.


Then I sewed one edge at a time, starting in the very middle of the rectangle to sew the top edge, right edge, and left edge.


For the fourth edge (where the seams of the rectangle met), I pinned one flap and sewed from the outside edge in from left to right, then pinned the second flap and sewed from the outside in from right to left.

Here's the bottom of the bag, turned inside out.

I then had to close up the flaps. At first I only sewed with the bag inside out, but that left about 1.5" of overlap where you could see the underside of the seam. So I just flipped it inside out again and sewed up the bag on the vertical line you can see above.
I left about a 5" opening at the top of the bag, taking a cue from the nasty bag I was replacing. At the base of that opening I made sure to reinforce the seams with an x-shaped closure. I'm not quite sure what it's called (certainly showing my sewing naivete), but it seems to work.


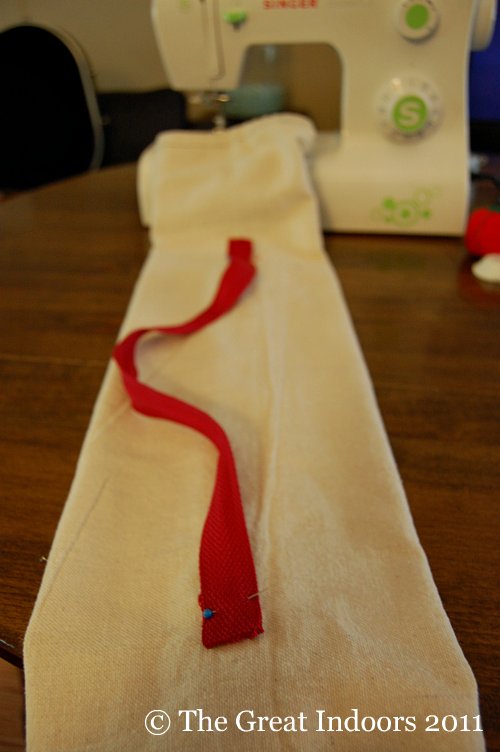
Now that the bag itself was done, it was time to tackle the drawstring. Rather than starting all over, I figured it would be easiest to use what I already had in front of me. First I cut off the current drawstring and unthreaded it.


The next part was a little tricky at first. I thought a lot about how to get the string through the fabric, including trying to attach it to a skewer. Who knows what I was thinking. Because as soon as I went for the skewers, it dawned on me that I should use the straws sitting right next to them.

It was as simple as sliding the thread through the straw, then using the straw to hold the fabric open while I pulled the straw through. It might be easier to show than to say:


I found it easiest to pinch the left side of the straw while bunching the fabric together over it. Make sure you can see both ends of the straw.


Still pinching the thread inside the straw, pull the straw out, leaving the fabric threaded!

To get the thread back into the fastener, twist the ends together tightly (so no fibers get loose in the meantime) while pushing down on the fastener's button.


I decided to go the same route with the bag's handle, using the handle from the existing bags. No reason to manufacture one when I had two perfectly good straps! I pinned it each end of the handle on the opposite side from the opening, leaving a little slack. The top of the strap is about six inches from the top of the bag.
I sewed another x-closure on each end of the strap, by hand this time. It probably would have been easier on me to sew the strap on before I sewed the bottom square, but it's a miracle I had gotten this far without chucking the sewing machine across the room abandoning my bags.

Thankfully, the third bag design fit like a charm. Which is why this is the story of Goldilocks. Aren't these bags just right?


I spent about $8 on the canvas drop cloth (6'x9'), plus another $4 or so on upholstery thread and a new pack of sturdy needles.* So for under $15, we got two new camp chair bags, plus leftover canvas that I'll be able to use on other projects (like my fall bunting!).
*For my sewers out there, I actually probably could have gotten away with just using my universal needle and regular thread. I didn't adjust my tension before starting with the thicker thread, so my seams turned out to be a little loopy. I did, however, break a needle on the first bag (still not sure how that happened) so I'm glad I grabbed a few extras!
So with that, DIY Week is complete! I hope you'll check out the other projects I posted this week, including spookifying our house, building a wine rack, paint-chipping my way to some free art, and sewing fall bunting. Hope you enjoyed everything and that you'll stop by next week for a little reveal of what Mr. Great Indoors and I did for a certain anniversary this week!
You could just buy a replacement at www.campchairbags.com
ReplyDeleteI thought your tutorial was great! Thanks
ReplyDelete